While deleting or reporting an email as spam is a good first step in dealing with unwanted emails on your iPhone 13, you may be looking for something more effective.
Fortunately, another option for banning all emails sent from a certain email address on the device’s default mail app is available.
Our post will show you where to find and how to use this option so you can start blocking email senders right now.
You can block an email sender on your iPhone 13 by opening the Mail app, swiping left on a message from the sender, tapping the three-dot button, and then selecting Block Sender.
To learn more about how to disable emails on the iPhone 13, watch this YouTube video.
How to Use the iPhone’s Block Sender Feature
- Open Mail.
- Swipe left on the message from the sender.
- Select the three dots.
- Choose Block Sender.
Our explanation continues below with further information, including screenshots, on how to blacklist an email sender on an iPhone 13.
Related: If you don’t want to see any emails from one of your accounts, then this guide about how to sign out of email on iPhone 13 can help.
If you receive unwanted emails from an unknown sender, you should either ignore them or click the “Unsubscribe” link provided in the message.
Individual emails, on the other hand, frequently do not have an unsubscribe option, and some persons will simply ignore the tip if you do not respond to their contacts.
We’ve already talked about how to block those who contact or text you, but emails are another type of unwanted communication.
You would block emails from them if you utilized the contact blocking option on a contact and added their email address to the contact card.
However, because many of the unsolicited emails you receive are likely from people you do not know, you may be wondering if there is another way to accomplish this.
There is, thankfully, and you can view our entire guide with visuals below to help you.
On an iPhone, how do you stop someone from sending you emails?
The steps in this post were completed on an iPhone 13 running iOS 16.4.
The same procedures will be followed for additional iPhone 13 models, such as:
- iPhone 13 Mini
- iPhone 13 Pro Max
- iPhone 13 Pro
Step 1: Open the Mail program.
Step 2: Find an email from the sender you wish to block and swipe to the left on the message.
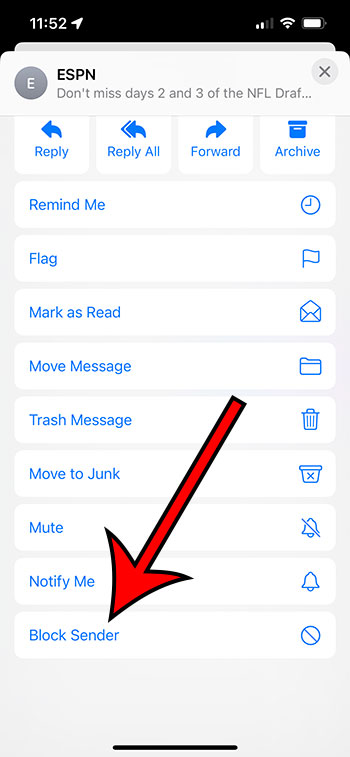
Step 3: Select the circle with three dots within it.
Step 4: At the bottom of this menu, select Block Sender.
Please remember that this only applies to emails from this specific email address. If the same person, organization, or business sends you emails from a different email address, you will continue to receive them unless you also block the new senders.
A red circle with a diagonal line should now show in the bottom-right corner of the message, indicating that future emails from this sender are no longer permitted.
If you want to unblock a sender later, swipe left on an email from them, tap the three-dot button, scroll to the bottom, and select Unblock Sender.
Now that you know how to block an email sender on an iPhone 13, you may help reduce the number of unsolicited emails you get.
Matt Partridge has been a freelance writer for years, writing about all kinds of tech topics. His favorite subjects are smartphones, however, and he focuses on articles about iPhones and Android for advance-peripherals.com.